Build a Data-Driven Product Demo that Converts
Learning Scenario
A brand wants a polished 60-second motion-graphics demo video for ZorgSocial — 16:9, 1080p, professional data-driven tone — built entirely inside easyZorg without a film crew. Rather than picking individual tools, you describe the intent and structure at each stage; easyZorg selects the best-fit model and executes every step automatically.
What you'll learn in this tutorial
From brief to finished production
Define Format, Brand Lock & Structure
Before touching any generation tool, lock every creative constraint in a single brief: FORMAT — 16:9, 1920×1080, 30fps. TONE — professional, data-driven, confident, modern-corporate. MOTION — clean restrained ease-in/ease-out curves, generous negative space, no bounce or playful easing. BRAND — palette #00C9B7 / #1B2A4A / #F5A623; mascot and logo as vector overlays, never generated; large bold kinetic typography with tight tracking. Then define the strict 60-second timing scaffold: [0–5s] Hook · [5–20s] Problem Visualized · [20–45s] Product Solution Screencast · [45–55s] ROI Stat Animation · [55–60s] CTA. Writing this brief first means easyZorg can route every subsequent generation with full context — format, tone, timing, and brand constraints all resolved before a single frame is generated.

ZorgSocial Logo — brand asset used as vector overlay in the Hook and CTA end card (never generated)
Open full sizeBuild the Hook & Problem Sections (0–20s)
Submit your brand brief and the mascot + logo reference assets to easyZorg and describe the first two scenes. Hook (0–5s): mascot on a clean branded background, one bold kinetic headline — "Most brands post. Strategists win." — logo flashes in; first frame must stop the scroll. Problem (5–20s): abstract data-overwhelm metaphor — a marketer buried under chaotic disconnected feeds, cool desaturated tones, on-screen text fragments "Random posts." / "No strategy." / "Vanity metrics." — building tension into a beat of stillness. easyZorg reads the combined timing, brand, and asset constraints and routes the job to the best-fit motion-graphics model. Tip: specify "no garbled UI text, consistent mascot across scenes" explicitly in the prompt — this prevents the most common failure modes.

Zorg Mascot — brand asset animated from the provided PNG; appears at Hook (0–5s) and CTA (55–60s)
Open full sizeGenerate the Product Solution Screencast Section (20–45s)
Describe to easyZorg a 25-second product solution section: six product screens composited into clean device/browser frames with smooth pans and highlight callouts, approximately 4 seconds each. Screens in order: (1) AI Strategy Planning dashboard — lead here, this is the strategy-first differentiator; (2) AI Persona generation showing "25 personas"; (3) AI Content Creation + localized editorial calendar; (4) Multi-platform publishing & scheduling calendar; (5) Real-time Analytics dashboard with KPIs and ROI; (6) "Talk to Zorg" AI assistant with mascot briefly reappearing. Specify that color returns to full saturation here — the visual "chaos → control" signal. easyZorg evaluates the number of screens, compositing complexity, and motion requirements and selects the best capable model for the screencast treatment.
Animate the ROI Stat Counters (45–55s)
Describe to easyZorg a 10-second ROI section on a clean dark premium data background: four animated number counters that tick up from zero using actual ZorgSocial figures — ROI ↑ "40%", Content creation time ↓ "80%", "15+" hours saved weekly, "25" AI-generated personas. Each counter eases up with a soft tick sound and a label fades in beneath. Specify: "crisp, premium, data-driven — no fast cuts, no off-brand colors." easyZorg routes the counter animation and typography requirements to the best-fit motion-graphics model. This is the proof beat — slow, deliberate pacing is essential.
Compose the Background Music & Assemble the CTA (55–60s)
Describe the music brief to easyZorg: 60-second instrumental business track, 0:00–0:18 quiet and minimal with steady build, exactly at 0:18 a clear lift into energetic modern-corporate section through to 1:00. easyZorg maps the energy arc and timing requirements to the best-fit music generation model and returns a 60-second track ready to sit beneath the voiceover and visuals. For the CTA end card (55–60s): mascot + logo lock-up, headline "Zorg makes it happen.", sub-line "Start your free trial — zorgsocial.com", a button-style CTA element, music resolves on the final second. Export the completed composition at 16:9 for LinkedIn and YouTube — do not crop to 9:16, B2B audiences consume this format on desktop.
Background Music — 60s instrumental business track generated via easyZorg · quiet build 0–18s → energetic 18–60s
Assemble the Timeline in the Video Editor
Navigate to the Video Editor within ZorgSocial. The timeline opens empty and ready for your assets. Click "Add New Media" and select "Add Existing Media" from the dropdown — this opens your Media Library where all previously generated assets are available. Locate and import the motion-graphics TSX file generated by easyZorg. Once imported, place it on the first layer of the timeline and adjust its duration to exactly 60 seconds to match the composition. Critical rule: never stack two assets on the same layer — overlapping media on a single track will cause conflicts. When you are ready to add the background music, move to the next available layer below, then position the playhead at second zero before dropping the audio file in so it starts from the very beginning of the composition.
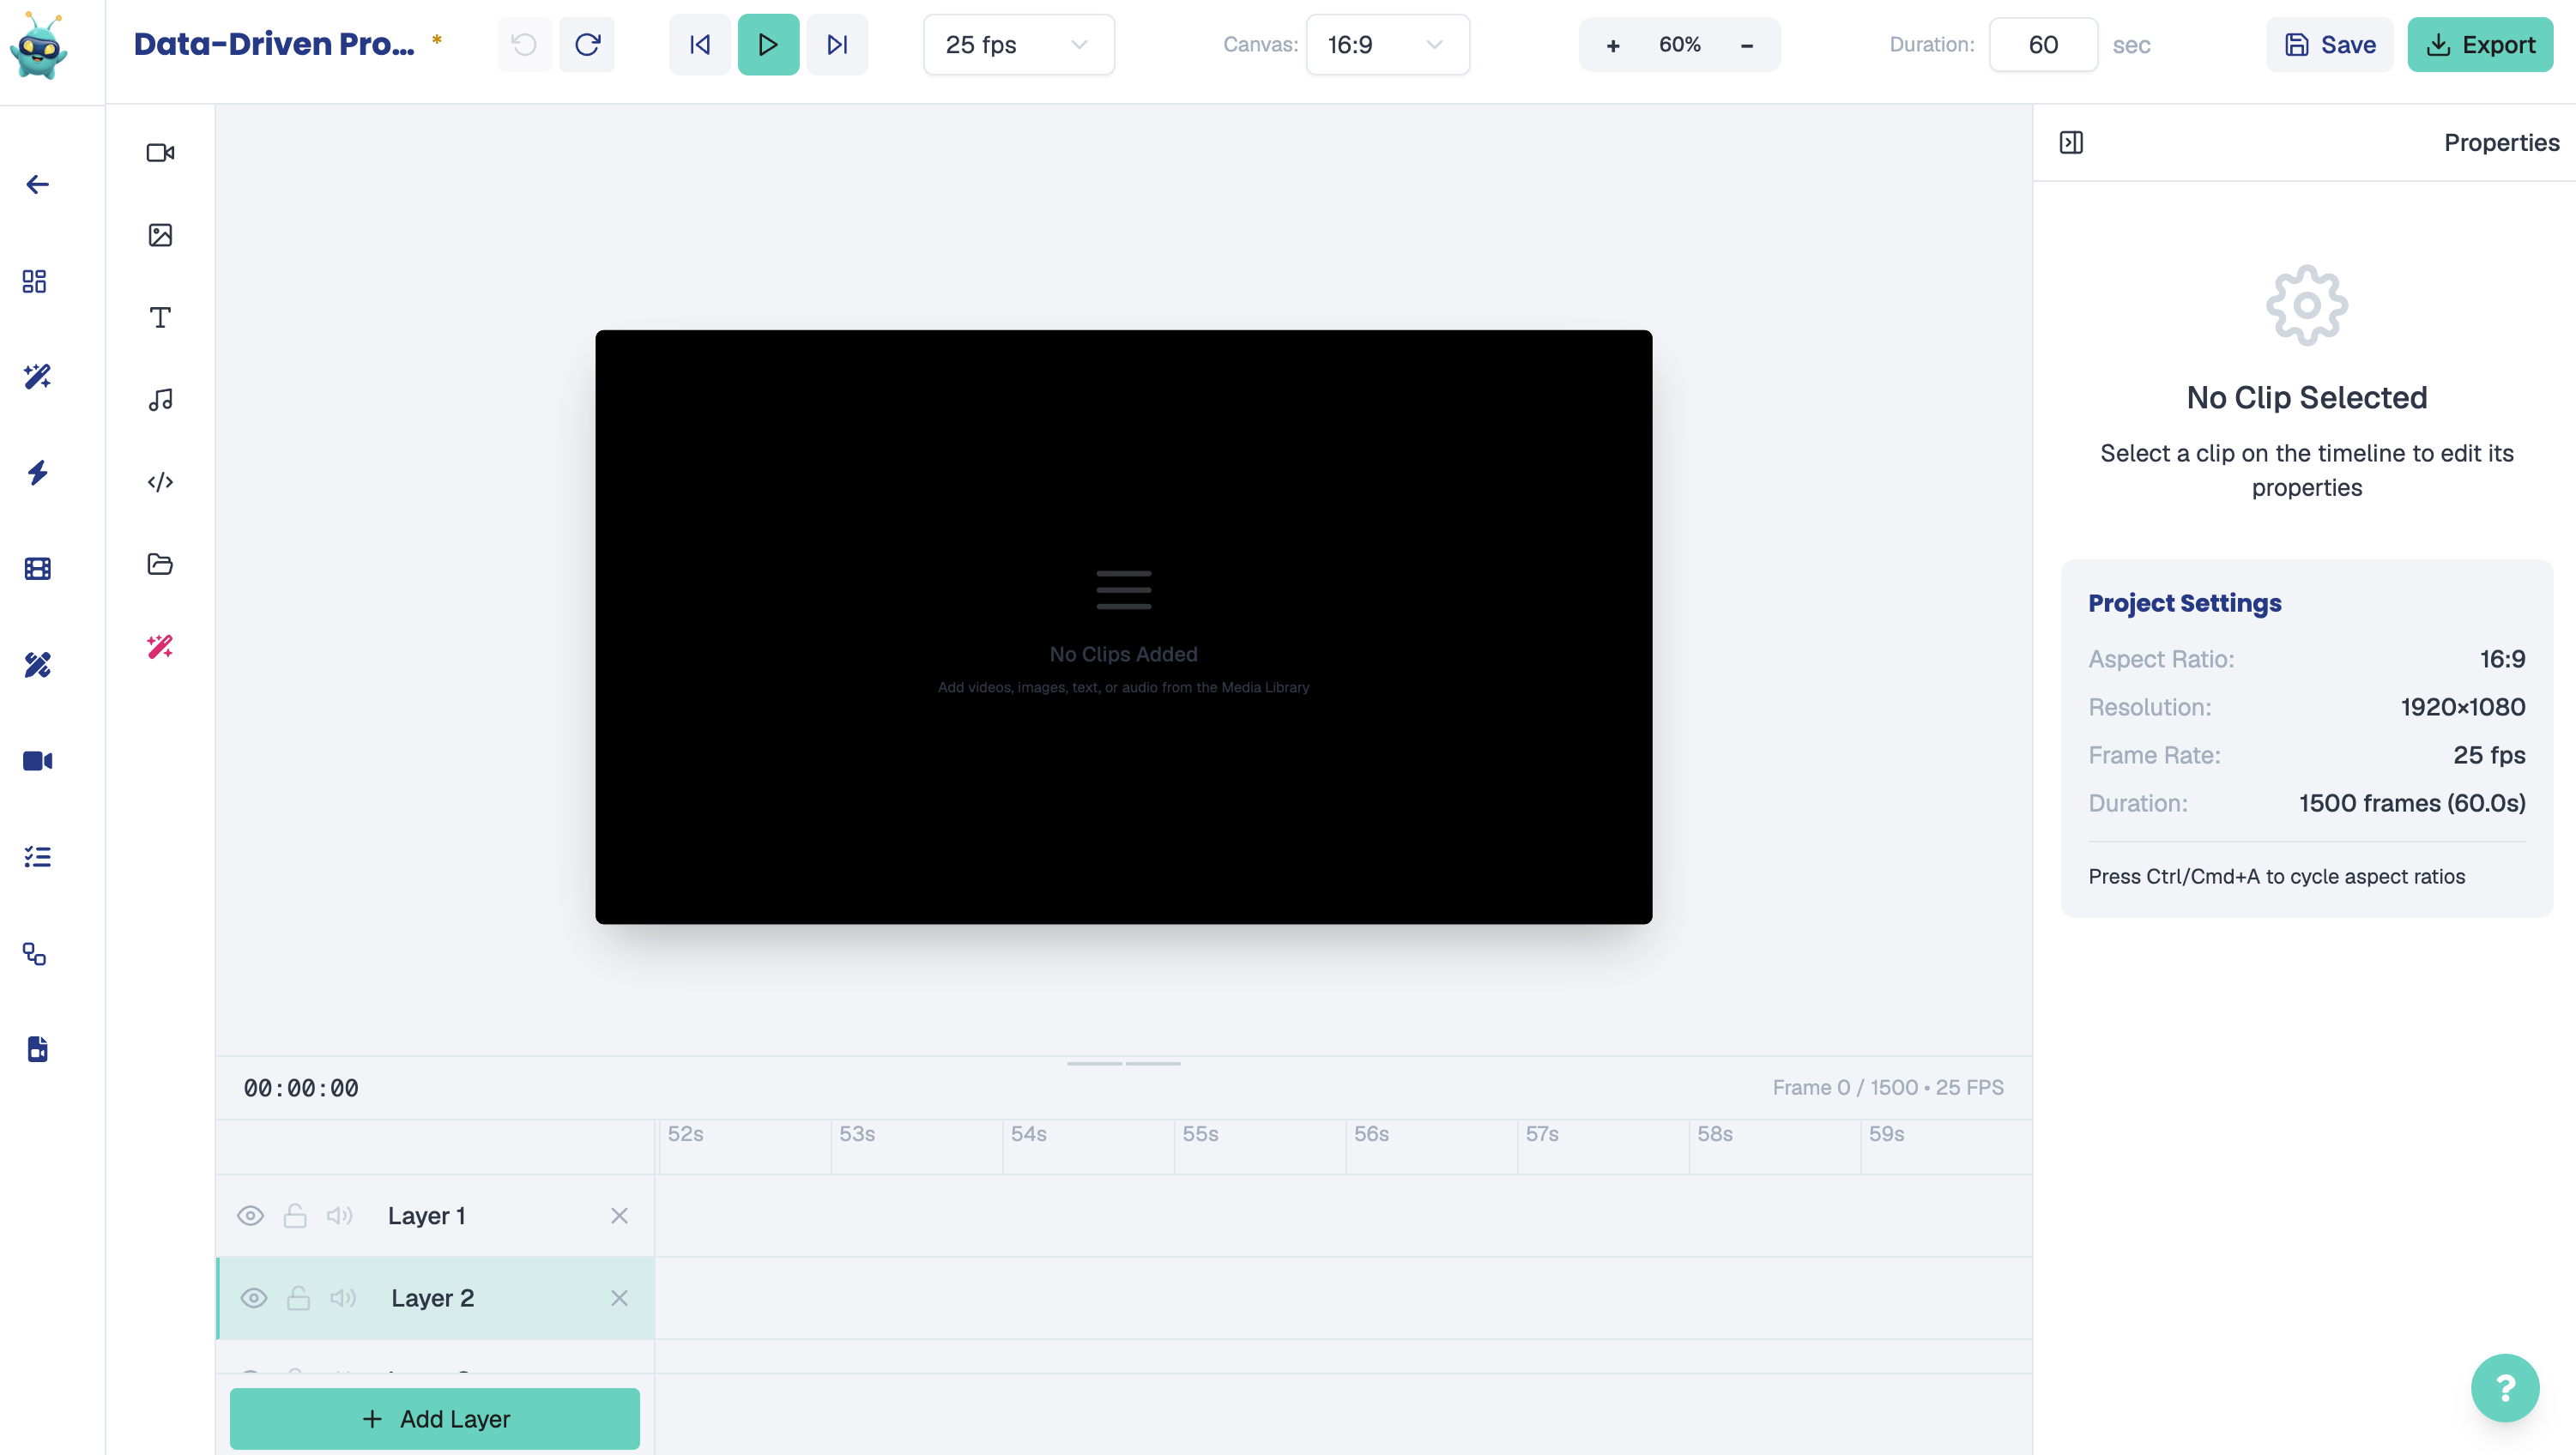
Video Editor — empty timeline ready for asset import
Open full size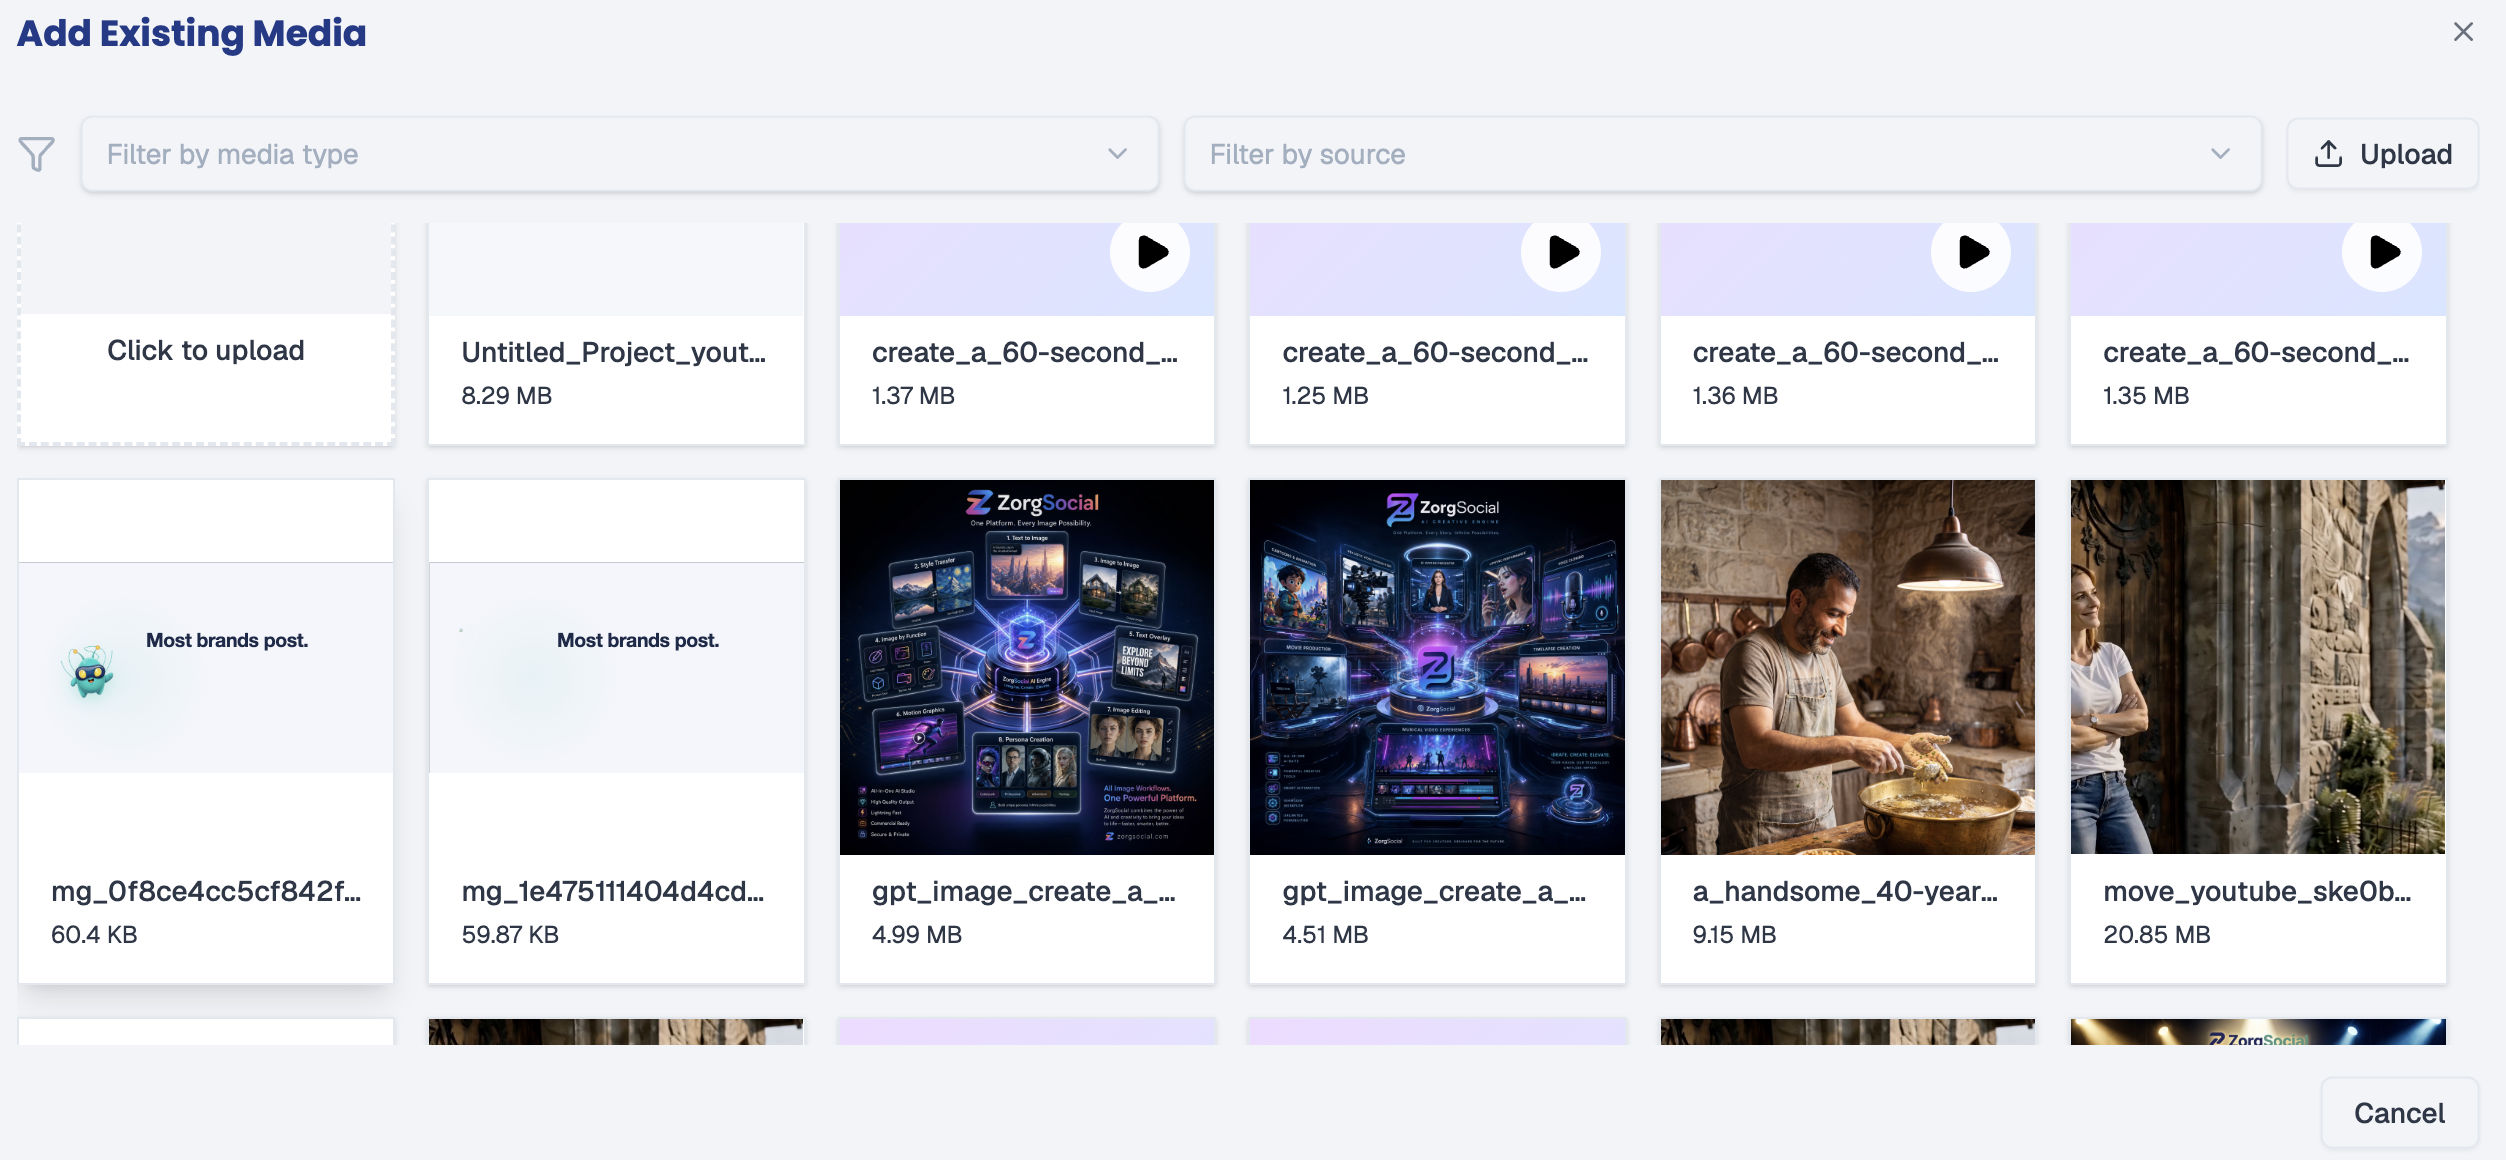
Add Existing Media — Media Library panel for selecting previously generated assets
Open full size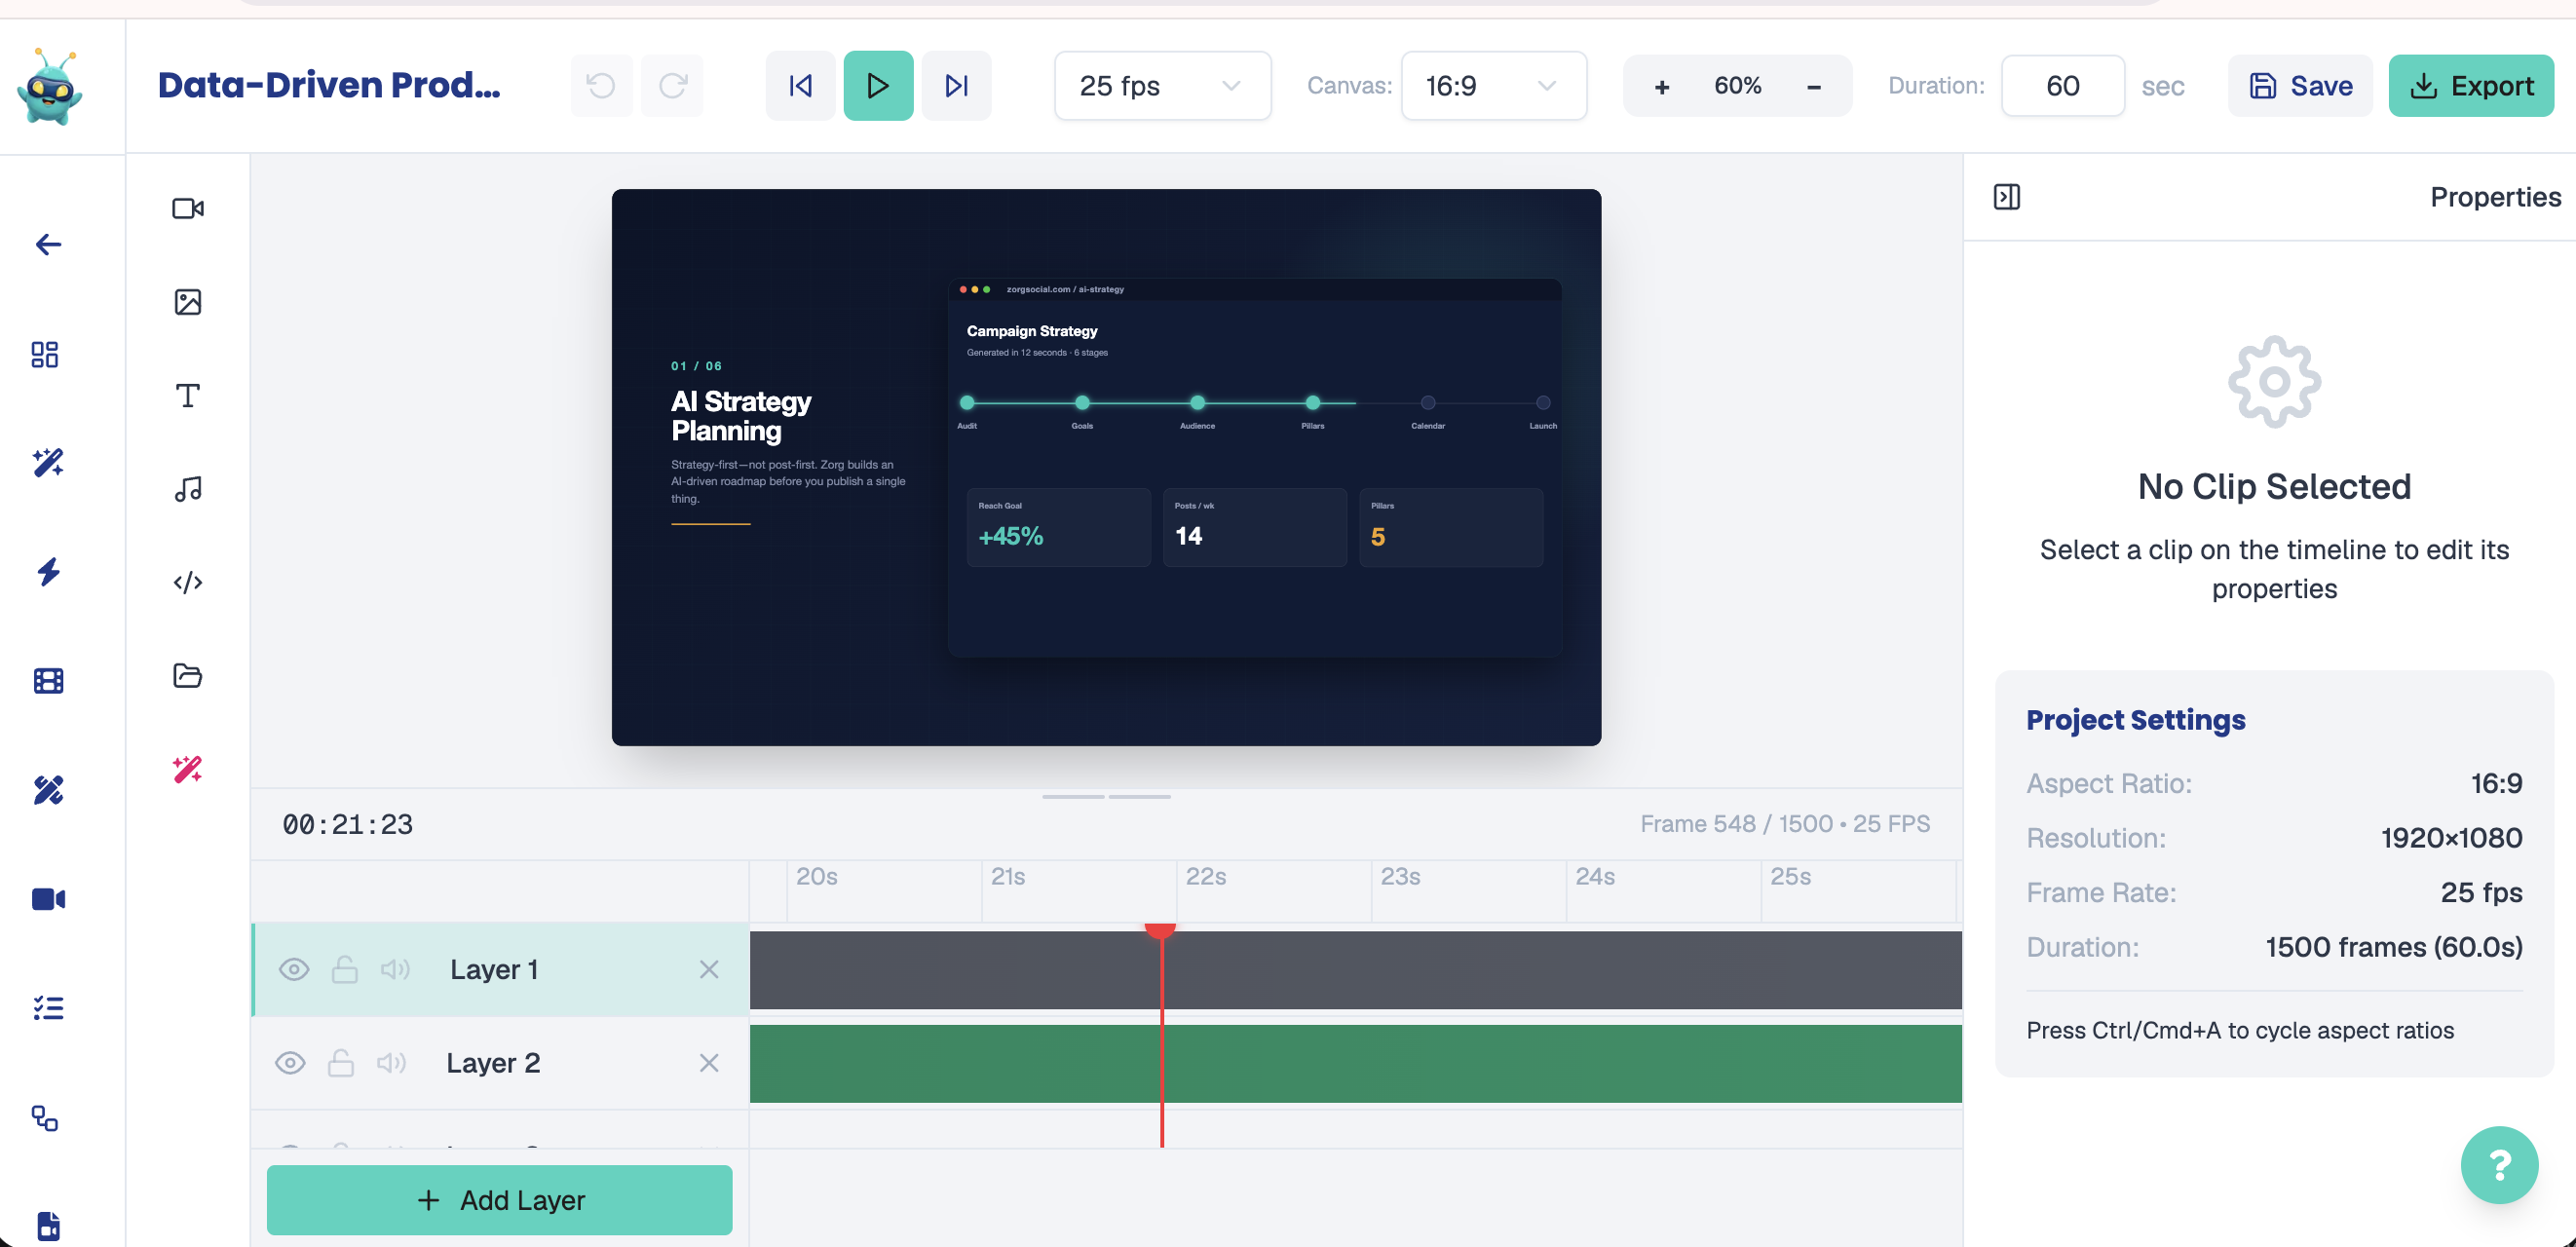
Video Editor — motion-graphics on Layer 1, background music on Layer 2, playhead at second zero
Open full sizeConfigure Export Settings
Once both assets are correctly placed on separate layers and the timeline reads exactly 60 seconds, click the "Export" button. In the export panel, begin by selecting the appropriate platform preset — this automatically sets the correct aspect ratio for your target platform (16:9 for LinkedIn and YouTube). Next, set the frame rate: for motion-graphics compositions, 30 fps is the recommended standard as it matches the original production specification and ensures smooth playback without unnecessary file size overhead. Finally, select the quality level, which governs the lossless compression rate and directly determines the output file size — higher quality produces a larger but visually sharper file. Review all settings before proceeding.
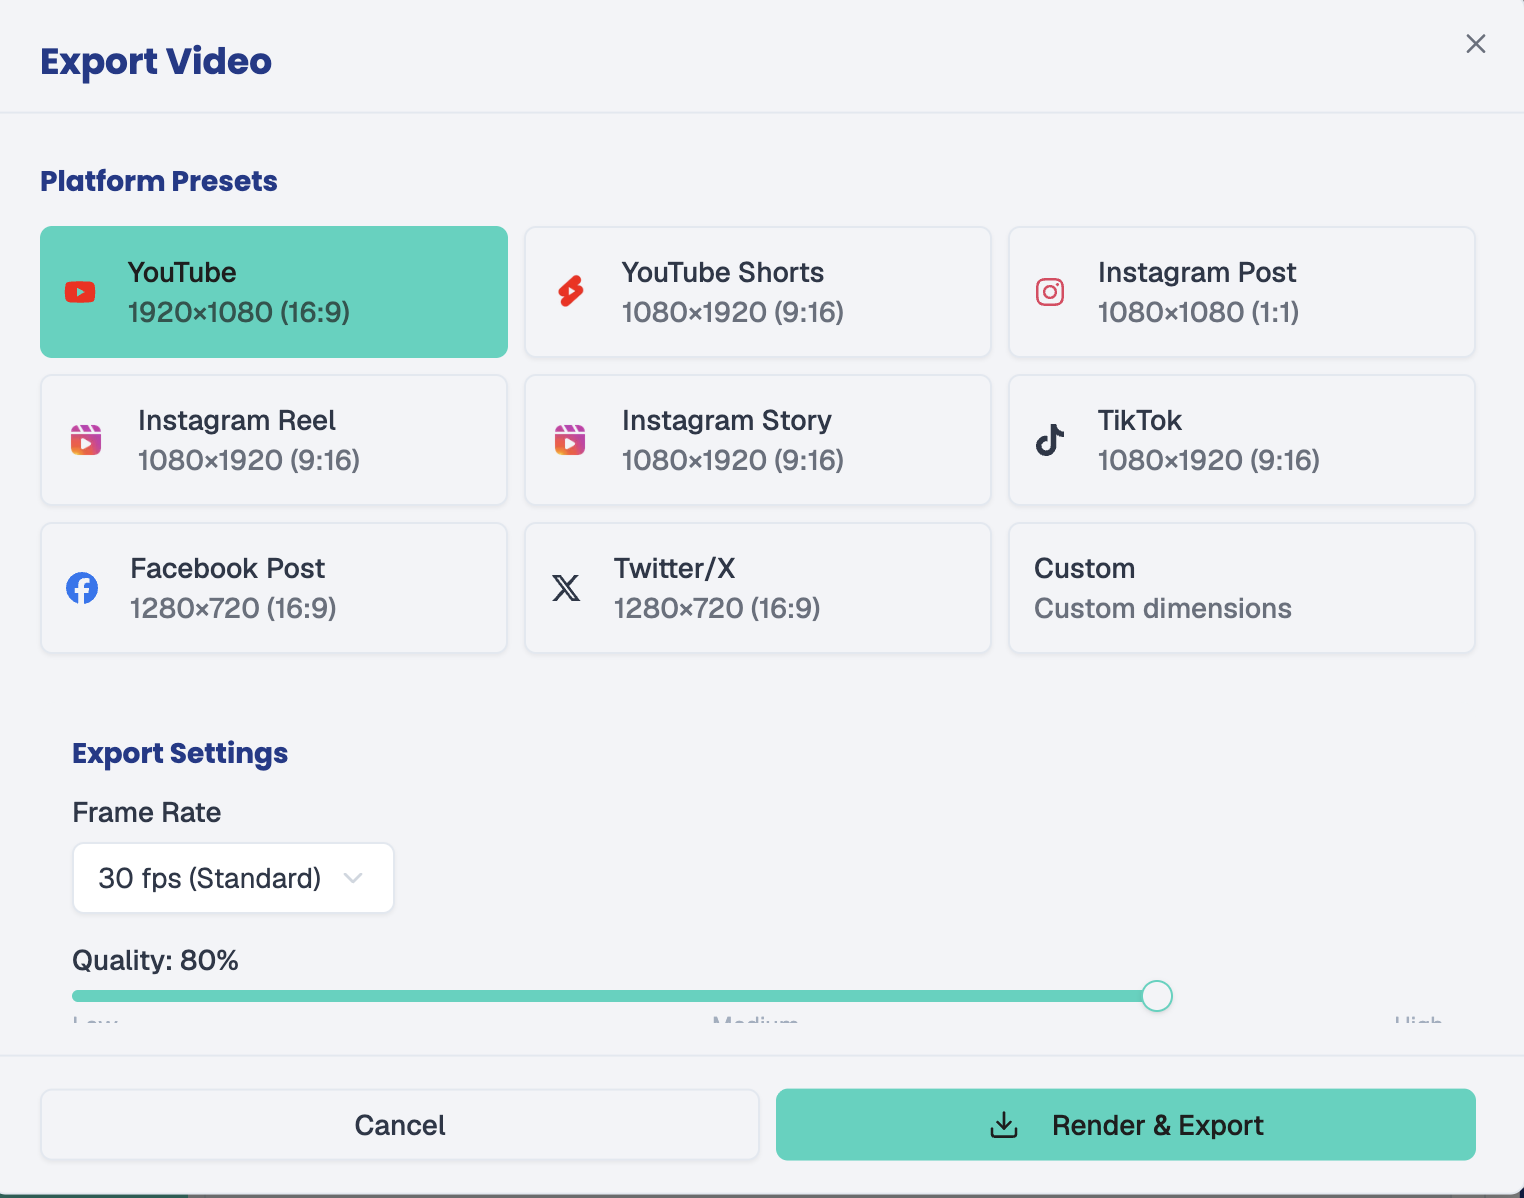
Export Panel — platform preset, frame rate (30 fps), and quality level settings before rendering
Open full sizeRender, Export & Retrieve Your Video
When you are satisfied with the export configuration, click "Render and Export" to begin the rendering pipeline. The platform will process the composition in the background — rendering time varies depending on the complexity of the motion graphics and the selected quality level. Once the render is complete, your finished video will be available under "Media Jobs" in your account. From there you can download the final file, review it for quality assurance, and proceed to schedule or publish it directly to your target platforms.
All assets produced in this tutorial
Every image, video, and audio file generated using Easy Zorg throughout this tutorial.
ZorgSocial Logo — brand asset used as vector overlay in the Hook and CTA end card (never generated)
Open full sizeZorg Mascot — brand asset animated from the provided PNG; appears at Hook (0–5s) and CTA (55–60s)
Open full sizeBackground Music — 60s instrumental business track generated via easyZorg · quiet build 0–18s → energetic 18–60s
Video Editor — empty timeline ready for asset import
Open full sizeAdd Existing Media — Media Library panel for selecting previously generated assets
Open full sizeVideo Editor — motion-graphics on Layer 1, background music on Layer 2, playhead at second zero
Open full sizeExport Panel — platform preset, frame rate (30 fps), and quality level settings before rendering
Open full sizeNext Step
Apply what you learned — inside ZorgSocial
Open Easy Zorg and start using the same tools you saw in this tutorial — free.